Alright, let’s talk about the ultimate lazy (but secretly genius) dinner move: Sweet Potato and Black Bean Quesadillas. These bad boys are my go-to when I want something stupid-easy but still packed with flavor no fancy skills required. Melty plant-based cheese, creamy sweet potatoes, and protein-loaded beans all hugged by a crispy tortilla? Yeah, it’s as good as it sounds. And the best part? You’re 25 minutes away from devouring them. Let’s get cooking.
Let’s talk about the rockstars in these quesadillas because this isn’t just random stuff thrown in a tortilla. Every ingredient has a purpose:
Sweet Potatoes 🍠 – Natural sweetness + creamy texture = the ultimate base. Plus, they’re loaded with fiber and vitamin A (aka the “glow-up” nutrient).
Black Beans – Protein-packed, hearty, and cheap. They add that satisfying oomph so you won’t miss meat. Pro tip: Mash a few for extra binding power!
Plant-Based Cheddar 🧀 – Melts like the real deal (no sad, chalky vegan cheese here). Daiya or Violife work great—pick your fave.
Whole-Wheat Tortillas 🌾 – Sturdy enough to hold the goods, with a nutty flavor. For gluten-free? Grab almond flour or corn tortillas just crisp ‘em up extra.
Avocado + Salsa + Yogurt 🥑 – The holy trinity of dipping/drizzling. Creamy, tangy, spicy… basically the flavor fireworks at the end.
Bottom line? This combo delivers no weird ingredients, no sad “healthy” taste. Just legit yum.
P.S. Hate dishes? Use the same skillet for everything. I won’t judge. 😉
NOTE: For measurements and rest of the ingredients check the recipe card below.
What You'll Need To Do
🍽 Servings: 4 ⏱ Time: 25 mins
Sweet Potato & Black Bean Quesadilla Magic ✨
Alright, let’s turn these ingredients into crispy, melty, oh-my-goodness quesadillas! Here’s how it goes:
1| Mash & Mix: Grab a bowl and toss in your mashed sweet potato, drained black beans, and that glorious plant-based cheese. Stir it up like you’re mixing confetti this is the party filling!
2| Tortilla Tango: Heat a skillet over medium heat. Throw one tortilla in there and let it warm up for about 20-30 seconds per side just enough to make it flexible (nobody likes a stiff tortilla).
3| Layer It Up: Spread half of that yummy filling onto the tortilla, then slap another tortilla on top like a cozy blanket. Press it down gently—say hello to your quesadilla sandwich!
4| Golden Glory: Cook for 1-2 minutes until the bottom is golden and toasty. Then, flip it with confidence (channel your inner chef!) and cook the other side for 2-3 minutes until the cheese melts into gooey perfection.
5| Repeat & Feast: Do the same dance with the remaining tortillas and filling. Slice ’em into wedges, then serve with dollops of plant-based yogurt, creamy avocado slices, and a spoonful of zesty salsa.
Pro Tip: Burner too hot? Lower the heat no one wants a charcoal tortilla. 😉 Dig in while they’re hot and melty!
Here’s the approximate nutritional breakdown per serving (1 quesadilla, assuming 4 servings total):
Glycemic Response
Glycemic Index (GI): ~45 (Low)
Glycemic Load (GL): ~12 (Moderate)
Macros per Serving
Calories: ~320 kcal
Carbs: 45g (Fiber: 10g, Sugars: 4g)
Protein: 12g
Fat: 10g (Saturated: 2g)
Notes:
Low GI thanks to fiber from sweet potatoes, beans, and whole-wheat tortillas.
GL is moderate due to portion size but balanced by protein/fat.
Is this recipe diabetes friendly?
Yes, with minor tweaks! Here’s why:
Why It’s Already Diabetes-Supportive ✅
Low Glycemic Index (GI ~45):
Sweet potatoes (lower GI than white potatoes) + black beans + whole-wheat tortillas slow digestion and prevent blood sugar spikes.
High Fiber (10g/serving):
Fiber from beans, sweet potatoes, and whole grains helps regulate glucose absorption.
Balanced Macros:
Protein (12g) and healthy fats (10g) from avocado/plant-based cheese further stabilize blood sugar.
To Make It Even More Diabetes-Friendly 🔧
Swap Tortillas: Use low-carb almond flour or chia seed tortillas (reduces carbs by ~15g/serving).
Boost Protein: Add 1/4 cup crumbled tofu or hemp seeds to the filling.
Reduce Portion Size: Serve 1 quesadilla + a leafy green salad to lower GL further.
Dip Smart: Skip sugary salsa opt for guacamole (healthy fats) or Greek yogurt (extra protein).
Bottom Line: The original recipe is a solid choice for diabetes management, but these tweaks optimize it further. Always pair with non-starchy veggies for balance!
Easy Ingredient Swaps for Your Quesadillas 🔄
Ran out of something? No sweat here’s how to keep the quesadilla dream alive:
Protein & Filling Swaps
Instead of black beans → Pinto beans, chickpeas, or lentils (mashed for texture).
No sweet potato? → Butternut squash, pumpkin puree, or even mashed cauliflower (for lower carb).
Cheese Alternatives
No plant-based cheddar? → Try mozzarella-style shreds, dairy-free pepper jack, or a sprinkle of nutritional yeast for cheesy flavor.
Dairy okay? → Regular shredded cheese works too (Mexican blend = 🔥).
Tortilla Hacks
Not into whole wheat? → Corn tortillas (gluten-free!), almond flour tortillas, or even lettuce wraps (for a low-carb crunch).
No tortillas? → Fold the filling into a pita or stuff it into a bell pepper half!
Topping Twists
No avocado? → Guacamole, hummus, or tahini drizzle.
Out of salsa? → Pico de gallo, hot sauce, or even marinara (weirdly good, fight me).
Skip yogurt → Cashew cream, coconut yogurt, or a squeeze of lime + cilantro.
Flavor Boosters (Add-Ins)
Spicy → Diced jalapeños, chipotle powder, or cayenne.
Herby → Fresh cilantro, chopped green onions, or parsley.
Crunchy → Thinly sliced cabbage, pickled red onions, or crushed tortilla chips inside the quesadilla.
Pro Tip: Leftover roasted veggies? Toss ‘em in! Zucchini, corn, or mushrooms work great.
Storage & Reheating Tips for Perfect Leftover Quesadillas ♻️
Storage Tips
✅ Fridge (3-4 days):
Let cool completely, then store in an airtight container with parchment paper between layers to prevent sticking.
Keep toppings (avocado, salsa, yogurt) separate to maintain freshness.
✅ Freezer (1-2 months):
Wrap uncooked or cooked quesadillas individually in foil or parchment, then place in a freezer bag.
Label with date sweet potato filling freezes like a champ!
Reheating for Maximum Crispiness
🔥 Skillet (Best Method):
No oil needed! Heat a dry non-stick pan over medium.
Cook frozen or thawed quesadillas 2-3 mins per side until crispy and heated through.
⏳ Oven (For Batch Reheating):
Preheat to 375°F (190°C). Place on a baking sheet; bake 10 mins (15 if frozen). Flip halfway for even crispness.
💥 Air Fryer (Fast & Crunchy):
370°F (187°C) for 4-5 mins (no preheat needed!). Spritz with water if tortillas look dry.
🚫 Avoid the Microwave:
Makes tortillas rubbery (unless you’re in a dire emergency then 30 secs max!).
Pro Tip: Revive stale quesadillas by brushing with a tiny bit of oil and toasting in a pan good as new!
Extra Hack: Freeze individual portions of the sweet potato-bean filling for future quick meals. Thaw overnight or microwave (stirring halfway) before assembling.
Which method works best for you? I’m team air fryer all the way! 😉
Final Thoughts
So there you have it my not-so-secret weapon for nights when I want a meal that’s fast, filling, and actually good for me (shocking, right?). These quesadillas are basically a high-five to my future self for not ordering takeout again. Whip ’em up, dunk ’em in salsa, and pat yourself on the back. And hey, if you accidentally eat the whole batch? No judgment here. Enjoy, and may your tortillas stay forever crispy. 🎉
My go-to easy vegan quesadillas with a sweet potato twist! 🍠🧀 Loaded with protein, fiber, and melty plant-based cheese great for picky eaters and quick dinners.
Ingredients
4oz plant based cheddar cheese, shredded (115g)
10.5oz sweet potato, cooked and mashed (300g, about 2 small sweet potatoes)
10.5oz canned black beans, drained (300g)
8 whole-wheat tortillas
8tbsp plant based Greek Yogurt, to serve
1 avocado, sliced, to serve
8tbsp salsa, to serve
Instructions
1
Prepare the Filling
In a medium mixing bowl, thoroughly combine the shredded plant-based cheddar cheese, mashed sweet potato, and drained black beans. Ensure the mixture is evenly distributed.
2
Heat the Tortillas
Place a large nonstick skillet over medium heat. Warm one tortilla at a time, heating for 20-30 seconds per side until pliable. Remove and set aside.
3
Assemble the Quesadillas
Lay one tortilla flat and evenly spread half of the filling mixture over its surface.
Place a second tortilla on top, pressing gently to adhere.
4
Cook to Golden Perfection
Return the assembled quesadilla to the skillet. Cook for 1-2 minutes, or until the underside is golden brown.
Carefully flip using a spatula and cook the opposite side for an additional 2-3 minutes, ensuring the cheese is fully melted.
5
Repeat and Serve
Repeat the process with the remaining tortillas and filling.
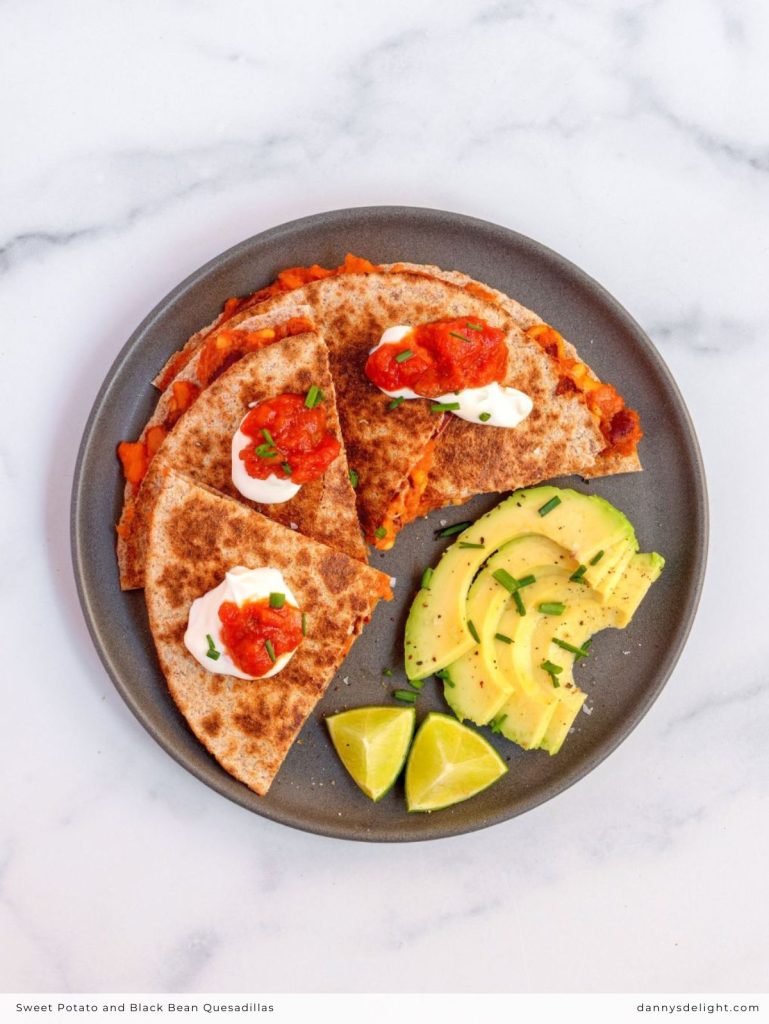
Transfer cooked quesadillas to a cutting board, slice into wedges, and serve immediately with plant-based yogurt, sliced avocado, and salsa.
Nutrition Facts
Servings 4
Amount Per Serving
Calories320kcal
% Daily Value *
Total Fat10g16%
Total Carbohydrate45g15%
Dietary Fiber10g40%
Sugars4g
Protein12g24%
* Percent Daily Values are based on a 2,000 calorie diet. Your daily value may be higher or lower depending on your calorie needs.
Hi, I'm Danny, the food lover and creator of this recipe blog. I aim to spark your culinary creativity with approachable recipes for all skill levels. Come join me in exploring delicious flavors and making memorable dishes together in my kitchen!