
You know those moments when you’re craving something sweet, creamy, and satisfying but you don’t want to spend forever in the kitchen or deal with a sink full of dishes? Friend, I’ve been there. That’s exactly why I fell in love with this Yogurt and Ricotta Berry Whip. It comes together in about five minutes, feels like a total treat, and somehow manages to be indulgent and wholesome. Let me show you just how easy it is to make your snack time feel special.
Try my High Protein Apple Salad recipe.
Why You’ll Love This Whip
Let’s be real this isn’t just another yogurt bowl. Here’s why it’s about to become your new favorite:
→ 5 Minutes, Seriously. From fridge to spoon in under five minutes. It’s the ultimate “I want something delicious NOW” solution.
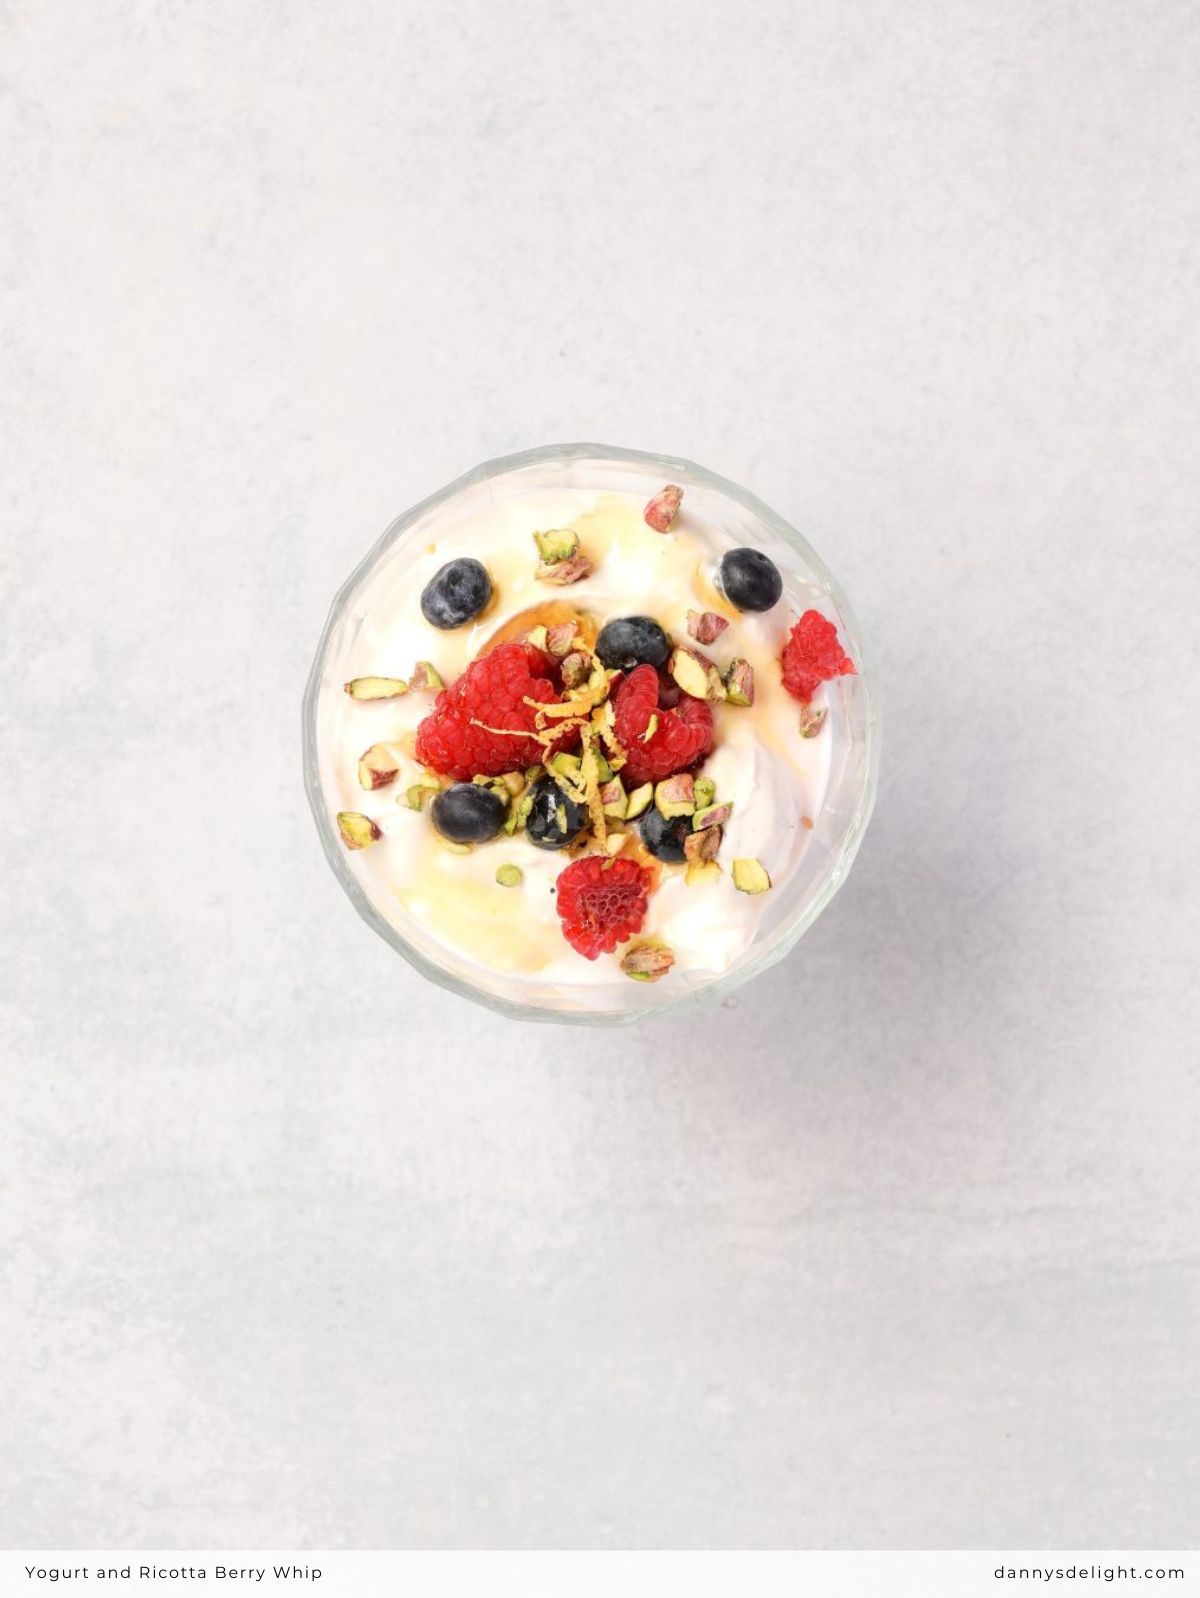
→ Feels Fancy, Totally Easy. With the lemon zest, pistachios, and a honey drizzle, it looks and tastes like it came from a cafe but you made it yourself with zero stress.
→ Creamy Dreamy Texture. Whipping the yogurt and ricotta together is a total game-changer. It becomes luxuriously smooth, light, and almost mousse-like.
→ Protein-Packed & Satisfying. Thanks to the Greek yogurt and ricotta, this isn’t a wimpy snack. It’s packed with protein to keep you full and fueled.
→ Endlessly Customizable. Swap the berries for whatever’s in season, use almonds instead of pistachios, or add a sprinkle of granola. Make it your own!
→ Just Sweet Enough. It’s lightly sweetened naturally by the berries and honey, not loaded with sugar. You get all the satisfaction without the crash.
→ The Perfect “In-Between.” Not quite dessert, not just a snack it’s that glorious treat you can enjoy anytime. Breakfast, post-workout, or a light dessert? Yes, yes, and yes.
Try my Whole-Grain Banana Yogurt Muffins recipe.
What You’ll Need To Make
Let’s Talk About The Good Stuff 🥄
So, what makes this whip so darn good? Let’s break down the heroes of the bowl:
1| Greek Yogurt & Ricotta: This isn’t just a random dairy duo. Think of them as the ultimate texture team. The Greek yogurt brings a thick, tangy punch packed with protein, while the ricotta adds an unbelievably light, slightly sweet creaminess. When you whip them together, magic happens. You get a mousse-like base that’s rich and satisfying but doesn’t feel heavy. It’s the secret to that “is this really healthy?” feeling.
2| The Lemon Zest & Vanilla: These are your flavor boosters, the behind-the-scenes superstars. Just a half-teaspoon of vanilla extract wraps everything in a warm, cozy sweetness. And that lemon zest? Don’t skip it! It doesn’t make things sour it just adds a bright, sunny little zing that makes the berries taste more like berries and cuts through the richness perfectly. It’s the detail that takes it from “good” to “oh wow.”
3| The Toppings (Pistachios & Honey): This is where you get that perfect contrast in every bite. The chopped pistachios add a lovely salty crunch and a gorgeous pop of color. And drizzling the honey on top at the very end means you get those lovely, sweet, sticky threads right where you want them. It’s texture and flavor heaven.
NOTE: For measurements and rest of the ingredients check the recipe card below.
What You’ll Need To Do
Serves: 1 Time: 5 mins
Alright, let’s turn these ingredients into that dreamy, creamy whip! It’s so easy, you’ll be done before you know it.
Let’s Make It:
1| The Creamy Base: Grab a medium bowl and plop in your Greek yogurt, ricotta, vanilla extract, and lemon zest. Now, take your hand mixer and go to town! Whip it on medium speed for a minute or two, until everything is beautifully smooth, creamy, and slightly fluffy. Taste it and do a little happy dance it’s already so good!
2| Berry Gentle Fold: Time for the colorful bit! Add your fresh berries to the bowl. Using a rubber spatula, gently fold them in. Think of it as giving them a tender hug into the cream, not a vigorous stir. You want to keep those pretty berries mostly intact.
3| Chill Time (Optional but Awesome): Spoon your gorgeous berry-speckled cream into your favorite serving dish a fancy glass, a cute bowl, whatever makes you smile. Sprinkle the chopped pistachios right on top. If you love a cold, refreshing treat, pop it in the fridge for 15-30 minutes. If you can’t wait (we don’t blame you!), move right to the final step!
4| The Sweet Finish: Right before you dig in, give it the golden touch. Drizzle that lovely honey right over the top. The contrast of the cool cream, crunchy nuts, sweet honey, and juicy berries? Absolute perfection.
Now, grab a spoon and enjoy your masterpiece!

Approximate Glycemic Index (GI): Low (~15-25) Glycemic Load (GL) per Serving: Low (~4-6)
Get Free Cookbooks

Kickstart your keto journey with our FREE Keto Cookbooks! 🎉 Packed with delicious recipes, these print copies are yours for the taking. Don’t wait – order now and start cooking your way to a healthier you! 🚀📚
*Hurry! offer valid till stock lasts.
Swap It & Make It Your Own! 🔄
The best part about this recipe is how flexible it is. Don’t have something? Craving a different flavor? No problem! Here are some easy swaps to keep things delicious:
For the Creamy Base:
- Ricotta Swap: No ricotta? Cottage cheese (blended until smooth) is a fantastic high-protein stand-in. For extra tang, try mascarpone (it’ll be richer!).
- Yogurt Swap: Skyr or plain whole-milk yogurt works great instead of Greek yogurt. For a dairy-free version, use a thick coconut or almond-based yogurt.
For the Fruit:
- Berry Alternatives: Use any fresh fruit you love! Chopped mango, peaches, or pitted cherries are amazing in summer. In winter, try sautéed cinnamon apples or pears.
- Frozen Fruit Hack: Short on fresh? Frozen berries work perfectly just thaw and drain them well so your whip doesn’t get watery.
For the Crunch & Toppings:
- Nut-Free or Different Crunch: Swap pistachios for sliced almonds, chopped pecans, walnuts, or a sprinkle of granola. For nut-free, try toasted coconut flakes or sunflower seeds.
- Sweetener Swaps: Not a honey fan? Maple syrup, agave nectar, or a dash of brown sugar are all delicious. For a lower-sugar option, a drop of vanilla stevia works.
Flavor Boosters (Get Creative!):
- Citrus Zest: Swap lemon zest for orange or lime zest.
- Spice It Up: Add a pinch of cinnamon, cardamom, or nutmeg to the creamy base.
- Fresh Herbs: A few chopped mint or basil leaves folded in with the berries is a surprisingly refreshing twist!
Mix-in Ideas:
- For extra texture and flavor, try folding in a tablespoon of chia seeds, cacao nibs, or dark chocolate chips.
Have fun with it! The goal is a creamy, satisfying bowl that makes you happy.
Try my Blackberry and Apple Cake recipe.
Twists & Tweaks to Play With
Once you’ve mastered the basic whip, it’s time to have some fun! Here are a few creative spins to keep your taste buds excited. Think of your bowl as a blank, creamy canvas.
1. The Tropical Escape 🌴 Swap the lemon zest for lime zest and the vanilla for a tiny drop of coconut extract. Use mango and pineapple as your fruit, and top with toasted coconut flakes and macadamia nuts. Close your eyes and pretend you’re on vacation.
2. The Chocolate-Covered Strawberry 🍫 Before whipping, add 1 tablespoon of unsweetened cocoa powder to the yogurt and ricotta. Use only fresh strawberries for the fruit, and top with shaved dark chocolate instead of pistachios. Drizzle with honey or chocolate syrup for the ultimate dessert vibe.
3. The “Lemon Bar” Remix 🍋 Double the lemon zest and add a tiny squeeze of fresh lemon juice to the base. Fold in some blueberries or keep it simple. Top with a buttery graham cracker or shortbread crumble instead of nuts for that classic lemon bar texture.
4. The Pumpkin Pie Spice (Hello, Fall! 🍂) Omit the lemon zest and vanilla. Add 2 tablespoons of pumpkin purée, a big pinch of pumpkin pie spice, and a drizzle of maple syrup to the base before whipping. Top with pecans and an extra sprinkle of spice.
5. The Jam Swirl 🌀 Skip folding in whole berries. Instead, after you’ve plated your plain whipped base, gently swirl in 1-2 tablespoons of your favorite berry jam or chia jam for pretty ribbons of sweet flavor.
6. The Protein Power Boost 💪 For a post-workout version, blend a scoop of vanilla or unflavored protein powder into the yogurt-ricotta mix before whipping. It’ll thicken it up even more and keep you full for hours.
Go wild and mix a few ideas! The base is your best friend it can handle just about any flavor you throw at it.
Try my Hazelnut Energy Balls recipe.
Pro-Tips for the Perfect Whip
Here are some useful tips to make sure your Yogurt & Ricotta Berry Whip turns out perfect every time, written in a friendly, easy-to-digest way.
Want to nail this recipe and maybe learn a trick or two? Here are my go-to tips for the best texture, flavor, and ease.
1. Get Your Ingredients Chilly. For the thickest, fluffiest whip, make sure your Greek yogurt and ricotta are cold straight from the fridge. A cold start helps everything hold together and whip up beautifully.
2. Whip It Good! (But Not Too Long.) The magic is in the whipping! Use a hand mixer for about 1-2 minutes on medium speed until it’s smooth and slightly increased in volume. Don’t overdo it, or the ricotta can start to separate.
3. “Fold” Means Be Gentle! When adding your berries, use a spatula and a light hand. Gently “fold” them in by turning the mixture over from the bottom. This keeps your berries pretty and intact instead of smashed and juicy.
4. The Lemon Zest Secret. Only zest the bright yellow part of the lemon skin (the zest), not the bitter white pith underneath. For maximum flavor, zest the lemon directly into the bowl with the yogurt so the citrus oils get captured.
5. Master the Make-Ahead. You can whip the base (without berries) up to a day in advance and store it covered in the fridge. Fold in the berries and add toppings right before serving so everything stays fresh and crunchy.
6. Fix a Runny Whip. If your mix seems a bit thin, it’s likely the ricotta. Next time, look for whole-milk ricotta and drain any visible liquid from the container first. You can also add a spoonful more Greek yogurt to thicken it up.
7. Toast Your Nuts. For next-level flavor and crunch, give your chopped pistachios (or any nuts) a quick toast in a dry pan for 2-3 minutes until fragrant. Let them cool before sprinkling.
8. Serve It Your Way. Love it cold? Chill the whole assembled dish for 15-30 minutes. Can’t wait? Eat it straight away it’s delicious either way! Just always add the honey at the very end.
Try my Lemon Blueberry Yogurt Cake recipe.

Smart & Budget-Friendly Tips
Love this recipe but want to keep it even more wallet-friendly? No problem! Here are some easy ways to save without sacrificing flavor.
1. Buy Store Brands & Larger Containers. The biggest saving hack? Opt for store-brand Greek yogurt and ricotta (like Great Value, Kroger, etc.). They’re just as good and cost less. Buying larger tubs of yogurt also gives you a better price per ounce use the rest for breakfasts or smoothies.
2. Make Your Own Ricotta (It’s Easier Than You Think!). If you’re feeling a little adventurous, homemade ricotta is surprisingly simple with just milk, lemon juice/vinegar, and salt. It’s fresher and often cheaper than many store-bought tubs plus, it feels extra satisfying!
3. Use Frozen Berries. Fresh berries can be pricey off-season. Frozen mixed berries are picked at peak ripeness, often cost way less per bag, and work perfectly here. Just thaw and drain them well to avoid extra liquid.
4. Stretch Your Vanilla. Pure vanilla can be pricey. For a recipe like this where it’s a supporting flavor, a quality artificial vanilla extract works totally fine and saves a few dollars. Or, skip it altogether and let the lemon zest shine!
5. Swap or Skip the Pistachios. Pistachios are delicious but can be one of the pricier nuts. Chopped almonds, walnuts, or even peanuts are great crunchy alternatives. Or, skip nuts altogether and use toasted oats or a sprinkle of granola from your pantry.
6. Buy Honey in Bulk. If you use honey regularly, buying a larger squeeze-bear or jar is much cheaper per ounce than the tiny decorative ones. It lasts forever, so it’s a smart pantry investment.
7. Zest & Juice the Whole Lemon. Don’t waste that lemon after zesting! Juice it and freeze the juice in ice cube trays for future recipes, smoothies, or salad dressings. Get the most out of every piece of produce.
8. Double the Batch. Making two servings doesn’t cost much more per bowl and saves you time later. The plain whipped base (without berries) keeps well covered in the fridge for 1-2 days just top when ready to eat!
Great flavor doesn’t have to come with a big price tag. A little savvy shopping goes a long way! 🛒
Try my Whole Wheat Fig and Banana Loaf recipe.
Fun & Tasty Ways to Serve It
This recipe is super versatile! Here’s how to enjoy it beyond the bowl:
1. The Classic Parfait – Layer the whip with granola and extra berries in a clear glass for that beautiful, Instagram-ready look. Everyone loves a parfait!
2. Breakfast Bowl Boost – Make it a full breakfast by serving it over a scoop of oatmeal or your favorite cereal. It adds creamy protein to your morning.
3. Fancy Dessert Upgrade. – Spoon it into small dessert cups or wine glasses and top with a mint leaf. It looks elegant and feels special perfect for a dinner party or a date night treat.
4. Toast or Pancake Topper – Swap out your usual spread! Use it as a fluffy, protein-rich topping for whole-wheat toast, waffles, pancakes, or French toast.
5. On-the-Go Jar – Make it ahead in a small mason jar with a lid. Add toppings right before you eat for a perfect portable snack at work, school, or the gym.
6. Sweet Dip Style – Serve it in a bowl surrounded by apple slices, pear wedges, graham crackers, or pretzels for dipping. It’s a fun snack for kids (and adults).
7. With a Side of Crunch – Keep the crunch separate! Serve the creamy whip in a bowl with a small side cup of granola, nuts, or seeds so everyone can add their own perfect amount.
8. Mini Dessert Bites – Use a melon baller or small spoon to scoop the whip onto vanilla wafer cookies or mini phyllo cups for easy, pretty, bite-sized treats.
Get creative with your presentation it’s all part of the fun! No matter how you serve it, it’s going to taste delicious.
Try my High Protein Tiramisu recipe.
Keeping It Fresh: Storage & Reheating Tips
Made a little extra? Here’s exactly how to store your whip so it stays delicious.
How to Store It:
- Best for Freshness: Store without any toppings (especially nuts and honey) in an airtight container in the fridge.
- How Long: The plain whipped base will stay fresh for 1-2 days. If you’ve already mixed in fresh berries, eat it within 24 hours as the berries will release juice and make it watery.
- Keep Toppings Separate: Store chopped nuts in a small bag at room temperature and add them fresh when serving. Always add the honey drizzle right before eating.
Can You Freeze It?
- Not Recommended. Freezing will completely change the creamy texture. The yogurt and ricotta will become grainy and separate when thawed. It’s best enjoyed fresh!
The Golden Rule: For the perfect texture and crunch, assemble your toppings just before you’re ready to eat. This keeps your whip creamy, your nuts crunchy, and your presentation pretty.
Try my Lemon Pie Overnight Oats recipe.
Final Thoughts
And that’s it you’re officially a whip master! Whether you enjoy it right away or let it chill for a bit, I hope this recipe becomes your go-to when you need something quick, delicious, and just a little bit fancy. Give one of the fun twists a try next time, or keep it classic it’s totally your call. Thanks for whipping it up with me. Now go grab a spoon and enjoy every creamy, berry-filled bite!
Recipe Card
Yogurt and Ricotta Berry Whip
My secret for the creamiest, dreamiest berry whip! 🍓 This easy 5-minute recipe combines Greek yogurt and ricotta for a protein-packed treat that’s sweet, tangy, and seriously satisfying. You’ve gotta try it!

Instructions
-
Prepare the Cream Base:
In a suitably sized mixing bowl, combine the plain Greek yogurt, ricotta cheese, pure vanilla extract, and freshly grated lemon zest.
-
Whip to Consistency:
Using a hand mixer set to medium speed, whip the mixture for approximately 1-2 minutes, or until it is uniformly smooth, well-integrated, and has a light, creamy texture.
-
Incorporate the Fruit:
Add the fresh mixed berries to the bowl. Using a silicone spatula, gently fold the berries into the cream base with care to maintain their structural integrity and avoid crushing.
-
Plate and Garnish:
Transfer the completed mixture into an individual serving vessel. Distribute the chopped pistachios evenly over the surface.
-
Final Preparation:
For optimal service, the assembled dish may be refrigerated, uncovered, for 15-30 minutes to chill thoroughly. Immediately prior to serving, finish with a drizzle of honey over the top.
Nutrition Facts
- Amount Per Serving
- Calories 424kcal
- % Daily Value *
- Total Fat 20g31%
- Total Carbohydrate 34g12%
- Protein 27g54%
* Percent Daily Values are based on a 2,000 calorie diet. Your daily value may be higher or lower depending on your calorie needs.


