
You know that feeling when you actually want a healthy breakfast but your taste buds are begging for something fun? Yeah, me too. That’s exactly why I created these Protein-Packed Banana Waffles. They’re my ultimate solution for a morning meal that feels like a total treat but fuels my day without any guilt. No complicated steps or weird ingredients just simple, delicious, and ready in minutes.
Try my Spinach Waffles with Avocado recipe.
Why You’ll Love This Recipe
Alright, let’s get real this isn’t just any waffle recipe. Here’s why it’s about to become your new breakfast bestie:
✔ Breakfast That Keeps You Going – No more crashing an hour after breakfast! Packed with plant-based protein, these waffles actually keep you full and fueled all morning.
✔ Secretly Healthy (Shhh!) – We’re sneaking in a banana, using coconut sugar, and keeping things dairy-free. They’re a healthier twist your taste buds won’t see coming!
✔ Ready in a Flash – From bowl to waffle iron in just 10 minutes? Yeah, you read that right. Perfect for busy mornings when you need a real breakfast, stat.
✔ Meal-Prep Magic – Make a big batch on Sunday, pop ‘em in the freezer, and you’ve got ready-to-toast waffles all week. Your future self will thank you.
✔ Totally Customizable – Feel like adding chocolate chips, blueberries, or a dash of cinnamon? Go for it! This recipe is your waffle canvas—paint it how you like.
✔ Vegan & Delicious – No eggs, no dairy, no problem! They’re 100% plant-based and 100% delicious, so everyone can dig in.
Basically, it’s the cozy, satisfying, and guilt-free breakfast you’ve been looking for. Let’s get cooking! 🧇
Try my Baked Salmon Rice Waffles recipe.
What You’ll Need To Make
Okay, let’s break down the dream team that makes these waffles so darn good. This isn’t just a random list each ingredient brings its own special magic to the breakfast table:
- That Spotty Banana: You know the one! The riper, the better. It’s our natural sweetener and adds so much moist, yummy flavor. No need for eggs here; this banana is the MVP that holds everything together.
- Vanilla Protein Powder: This is our secret weapon for staying power! It packs in the plant-based protein and gives us that delicious vanilla cake batter vibe. It’s basically what turns these from a treat into actual fuel.
- Coconut Sugar: We’re ditching the refined stuff for a better option. I love using coconut sugar because it adds a warm, caramel-like sweetness and keeps our blood sugar from doing a rollercoaster ride.
- Unsweetened Almond Milk: This keeps our batter perfectly dairy-free without weighing it down. It’s the light, neutral base that lets all the other flavors shine through!
Together, these ingredients create something truly special: a waffle that’s healthy enough for a weekday but tasty enough for a slow Saturday morning.
NOTE: For measurements and rest of the ingredients check the recipe card below.
What You’ll Need To Do
Time required: 25 mins
Alright, let’s get this waffle party started! First things first, plug in that waffle iron and let it heat up. Get it nice and hot so our waffles get perfectly crispy.
While that’s warming up, grab a big bowl. Take your banana and get squishing! A fork works perfectly to mash it up until it’s nice and goopy. Now, pour in your almond milk and give it a good stir. Next, add that yummy vanilla protein powder and mix it in until you don’t see any more dusty pockets.
Time for the dry crew! Sprinkle in the flour, baking powder, and coconut sugar. Now, mix it all together until everything is just combined and you have a smooth, happy batter. Don’t overmix it a few little lumps are totally fine.
Alright, the moment of truth! Your waffle iron should be ready and waiting. Spoon enough batter to cover about ¾ of the iron it will spread out, we promise! Close the lid and let the magic happen. Cook until it’s golden brown and delicious, following your iron’s cues (usually the steam stops or a light goes off).
This recipe makes four gorgeous waffles, so that’s two per person no fighting!
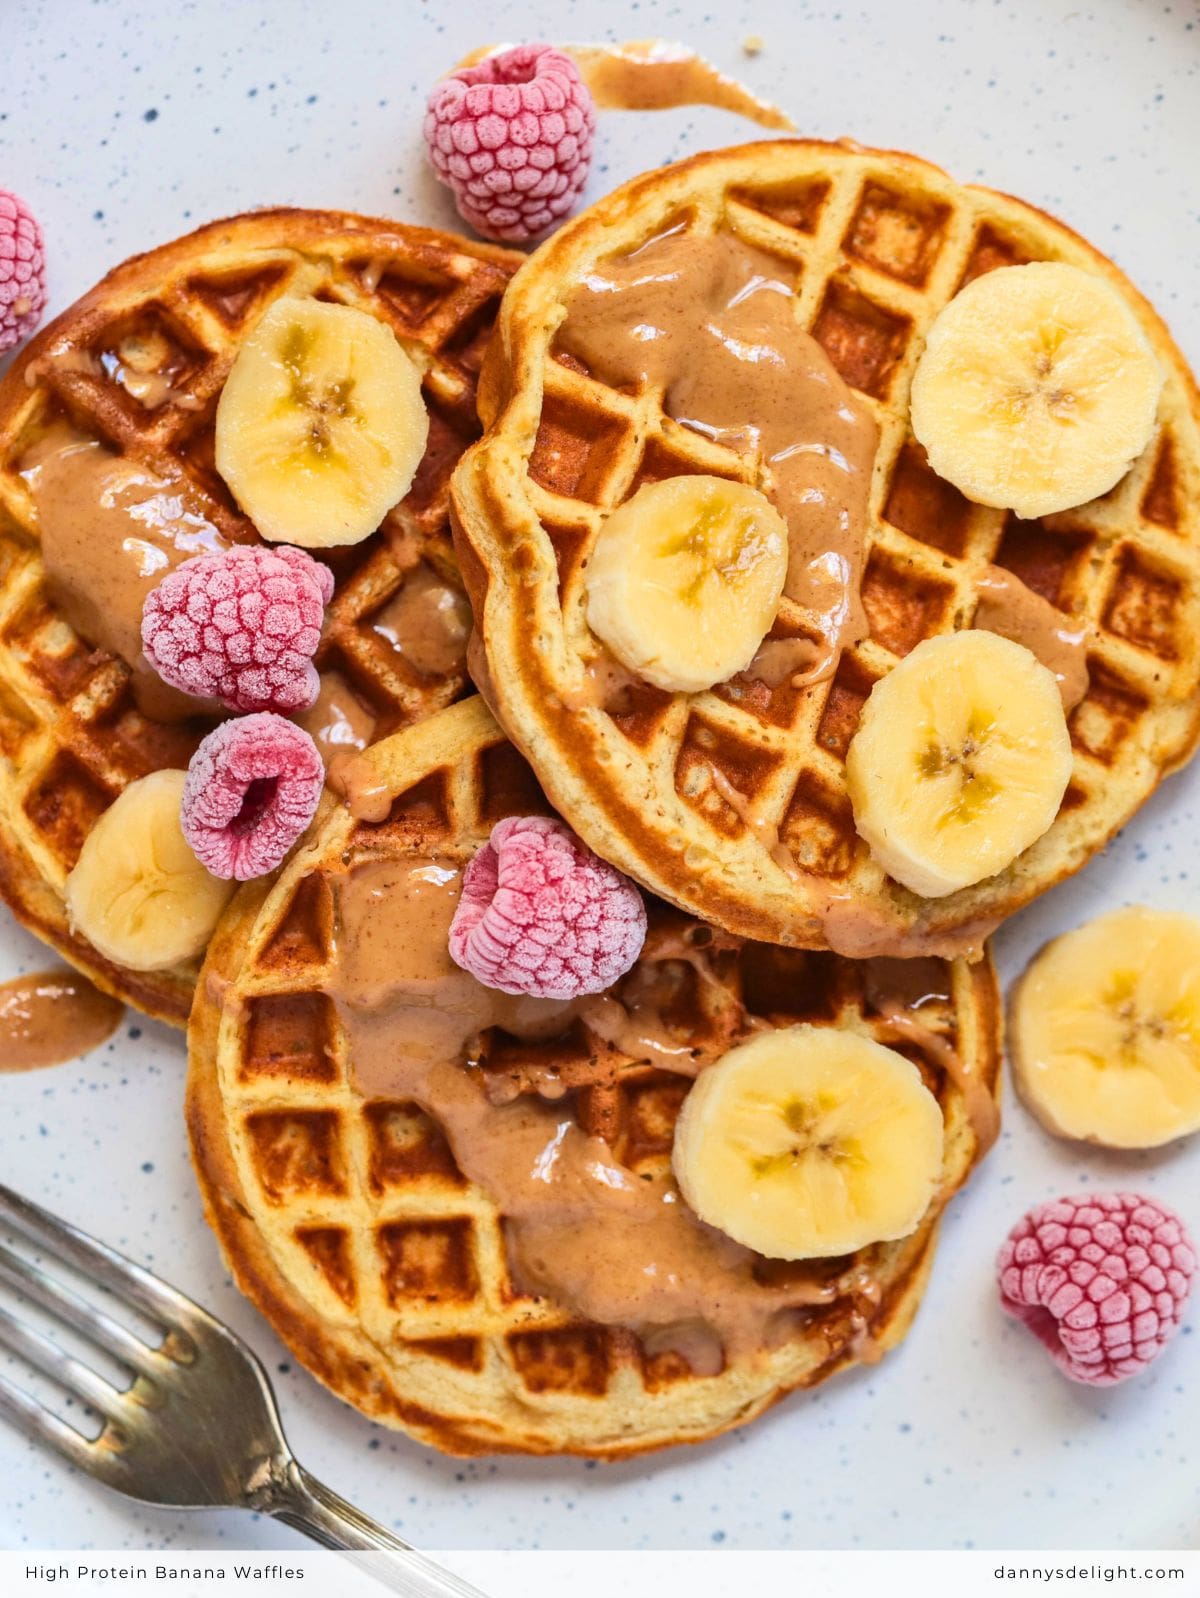
Time to feast! We love them topped with extra banana slices, a handful of fresh berries, and a glorious drizzle of peanut butter. Dig in!

Approximate Glycemic Index (GI):Low to Medium (~40-55)
Why: The primary carbohydrates come from the banana and all-purpose flour. The banana (especially when ripe) and flour have a medium GI, but this is balanced by the protein powder and fat-free almond milk, which help lower the overall glycemic response.
Approximate Glycemic Load (GL):Low (~10-12)
Why: Glycemic Load takes portion size into account. While the GI is medium, the total available carbohydrates per serving is moderate, resulting in a low GL, meaning a smaller impact on your blood sugar.
Get Free Cookbooks

Kickstart your keto journey with our FREE Keto Cookbooks! 🎉 Packed with delicious recipes, these print copies are yours for the taking. Don’t wait – order now and start cooking your way to a healthier you! 🚀📚
*Hurry! offer valid till stock lasts.
Easy Ingredient Swaps
Here are some simple and flexible swap ideas for your Protein-Packed Banana Waffles, perfect for using what you have on hand.
Milk Swap:
- Instead of almond milk: Any plant-based milk like oat, soy, or cashew works great. Regular cow’s milk will also work if you’re not strictly vegan.
Flour Swap:
- Instead of all-purpose flour: For a heartier, whole-grain option, you can use whole wheat flour or white whole wheat flour. For a gluten-free version, use a 1:1 gluten-free baking blend.
Sugar Swap:
- Instead of coconut sugar: You can use an equal amount of brown sugar, maple syrup, or even regular white sugar. The flavor will change slightly, but it’ll still be delicious!
Protein Powder Swap:
- Instead of vegan vanilla: Any flavor protein powder will work (chocolate would be yummy!). If you use a non-vegan whey or collagen protein powder, note that you may need a splash more milk as they tend to absorb liquid differently.
Flavor & Add-in Ideas:
- Spice it up: Add a teaspoon of cinnamon or a pinch of nutmeg to the dry ingredients.
- Chocolate fix: Stir in a handful of dairy-free chocolate chips to the batter.
- Nutty crunch: Fold in some chopped walnuts or pecans.
- Berry blast: Gently mix in fresh or frozen blueberries right before cooking.
Try my Oatmeal Cottage Cheese Waffles recipe.
Twist and Tweak Ideas
Here are some fun twists and tweaks to make these waffles your own, keeping that laid-back, friendly vibe.
The best part about a solid base recipe is making it your own! Here are some of my favorite ways to mix things up when I’m feeling fancy.
1. The Chocolate Lover’s Dream 🍫
- Swap the vanilla protein powder for chocolate protein powder.
- Stir a handful of dark chocolate chips into the batter. You can’t go wrong.
2. The Cozy Spice Version 🍂
- Add 1 tsp of cinnamon and a pinch of nutmeg to the dry ingredients. It makes your kitchen smell incredible and tastes like fall, any day of the year.
3. The Berry Blast Twist 🫐
- Gently fold in ½ cup of fresh blueberries or raspberries into the batter right before cooking. You get a little burst of juicy flavor in every bite!
4. The Nutty Crunch Upgrade 🥜
- Fold in ¼ cup of chopped walnuts or pecans for a delicious crunch and extra healthy fats.
5. The “Cookie Dough” Vibe 🍪
- Swap the coconut sugar for maple syrup and add a handful of vegan mini chocolate chips. It tastes like a treat but is still packed with protein!
Pro-Tip: If you’re adding mix-ins, just be careful not to overfill your waffle iron. A little goes a long way!
The moral of the story? Don’t be afraid to play with your food. Happy experimenting
Try my Lemon Poppy Seed Waffles recipe.
My Best Tips for Waffle Success! 🧇
Here are some useful, practical tips for your recipe, written in a friendly and approachable way.
I’ve made these more times than I can count, and here’s the inside scoop for getting them perfect every single time.
1| Banana Ripeness is Key: The spottier and browner the banana, the sweeter and more flavorful your waffles will be. A green-tipped banana just won’t have the same power!
2| Don’t Overmix the Batter: This is the #1 rule for fluffy waffles! Just mix until the dry ingredients are combined. A few lumps are totally okay they’ll work themselves out in the waffle iron. Overmixing = tough waffles.
3| Let the Batter Rest (If You Can!): If you have an extra 5 minutes, let the batter sit. This allows the flour to hydrate and the baking powder to start working, which leads to a fluffier final product.
4| Grease Your Waffle Iron Well: Even if it’s non-stick, a quick brush of oil or spritz of cooking spray will guarantee your waffles release easily with a perfect crispy exterior.
5| Resist the Urge to Peek!: I know it’s tempting, but don’t lift the lid early! You’ll let the steam escape and risk tearing your waffle. Trust the process (and the timer on your iron).
6| Keep Them Crispy: For the crispiest waffles, serve them immediately right off the iron. If you’re making a batch for a crowd, keep them crispy by placing them in a single layer on a wire rack in a 200°F oven until you’re ready to serve. This prevents them from getting soggy.
7| Freeze Like a Pro: These waffles freeze amazingly well! Let them cool completely, then pop them in a single layer on a baking sheet to freeze solid. Once frozen, transfer to a zip-top bag. Reheat straight from the freezer in the toaster for a quick and easy breakfast!
Try my Peaches and Cream Buttermilk Waffles recipe.

Waffles on a Budget? No Sweat! 💸
Love this recipe but wanna keep it even kinder to your wallet? Here are my favorite hacks to save some cash while still making delicious waffles.
1| Swap the Milk: Unsweetened almond milk is already pretty affordable, but if you have another milk on hand like regular cow’s milk or even water in a pinch go ahead and use it! No need to buy something special.
2| Protein Powder Power Move: Instead of using expensive vegan vanilla protein powder, try using unflavored or vanilla whey protein if you’re not strictly vegan. It’s often more affordable and works just as well. You can even skip it and add an extra ¼ cup of oats or flour, though you’ll lose a bit of the protein punch.
3| Sugar Switch-Up: No coconut sugar? No problem! Brown sugar works perfectly and is a pantry staple for most folks. It adds a similar warm, molasses-like flavor.
4| Buy in Bulk: If you make smoothies or baked goods often, look for protein powder and oats in the bulk bin section of your grocery store. You can buy exactly what you need for the recipe, which avoids waste and saves money long-term.
5| Use Up Those Brown Bananas: This recipe is perfect for those bananas that have gone too spotty to eat on their own! Instead of tossing them, peel ’em, pop them in a freezer bag, and freeze them for future waffle batches. It reduces food waste and means you always have ripe bananas ready to go.
6| Skip Fancy Toppings: While peanut butter, fresh berries, and maple syrup are delicious, they can add up. Yogurt, a sprinkle of cinnamon, or even a drizzle of honey are fantastic and more affordable alternatives.
Making delicious, healthy food doesn’t have to be expensive. A little flexibility goes a long way!
Try my Spinach and Feta Tortilla recipe.
How to Serve Your Waffles
The fun doesn’t stop when the waffle iron beeps! Here’s how my family and I love to dress these bad boys up.
🍓 Classic Breakfast Spread:
You can’t go wrong with the classics! Pile on…
- Fresh banana slices and berries (strawberries, blueberries, or raspberries)
- A generous drizzle of maple syrup or honey
- A dollop of Greek or plant-based yogurt
🥜 Protein Powerhouse:
Perfect for after a workout or a super busy day.
- A big scoop of almond butter, peanut butter, or your favorite nut butter
- A sprinkle of chia seeds, hemp hearts, or chopped nuts for extra crunch and nutrients
🍫 Dessert-for-Breakfast:
For those days when you need a little extra joy.
- A handful of chocolate chips or cacao nibs
- A scoop of dairy-free ice cream (hello, waffle sundae!)
- A light dusting of powdered sugar or a drizzle of melted peanut butter
🌱 Fresh & Fruity:
Light, refreshing, and packed with flavor.
- Sliced peaches, nectarines, or apple slices sautéed with a pinch of cinnamon
- A spoonful of fruit compote or berry jam
🍯 Keep It Simple:
Sometimes, less is more.
- A little smear of butter or coconut oil and a sprinkle of cinnamon sugar
- Enjoy them plain right out of the iron they’re that good!
My best advice? Set up a “waffle bar” with a few toppings and let everyone build their own masterpiece. Happy eating
Try my Zucchini Breakfast Pizza Crust recipe.
Keeping & Reheating Your Waffles
Made a double batch? Awesome! Here’s exactly how to store and reheat your waffles so they taste just as good as when they were fresh.
To Store for Later:
- Let them cool completely on a wire rack. This is key to preventing sogginess!
- In the Fridge: Place them in an airtight container or bag with a paper towel to absorb moisture. They’ll stay good for 2-3 days.
- In the Freezer (The Best Method!): This is my go-to for meal prep. Once cooled, lay them in a single layer on a baking sheet and flash freeze for about an hour. This keeps them from sticking together. Then, just toss them into a freezer bag. They’ll be perfect for up to 3 months.
To Reheat for That “Just-Made” Crispness:
- From the Fridge: The toaster is your best friend! Use a medium setting to get the outside crispy and the inside warm. No toaster? A toaster oven or air fryer at 350°F for a few minutes works wonders.
- From the Frozen (No Thawing Needed!): Seriously, don’t thaw them! Pop them straight from the freezer into the toaster (you might need to run it twice) or air fryer (about 3-4 minutes at 350°F). They’ll come out perfectly crispy every single time.
- The Oven Method (For a Batch): If you’re reheating a lot, preheat your oven to 375°F. Place the waffles in a single layer on a baking sheet for 5-8 minutes (10 minutes if frozen).
Pro-Tip: Avoid the microwave if you can it makes them soft and chewy. But if you’re in a real hurry, 20-30 seconds will warm them up, though they won’t be crispy.
Try my Savoury Cottage Cheese Bowl recipe.
Final Thoughts
And that’s it, my friend! You’ve just unlocked the secret to a breakfast that’s both awesome and actually good for you. I really hope these waffles become a regular in your kitchen like they are in mine. Give them a try and let me know how you top them I’m always looking for new ideas. Now, go enjoy your well-deserved waffle victory
Recipe Card
Protein-Packed Banana Waffles
Focus on Ease & Convenience: Learn my secret for easy, fluffy vegan waffles ready in under 30 minutes! Perfect for a quick, healthy breakfast that actually tastes amazing. 😋

Ingredients
Instructions
-
Preheat the waffle maker according to the manufacturer's specifications.
-
Prepare the wet ingredients by mashing the banana in a large mixing bowl. Add the almond milk and whisk until combined. Incorporate the protein powder into the mixture, ensuring it is fully integrated and no dry pockets remain.
-
Combine the dry ingredients by adding the all-purpose flour, baking powder, and coconut sugar to the wet mixture. Mix until a smooth, consistent batter is formed. Avoid overmixing.
-
Portion the batter onto the center of the preheated waffle iron, filling approximately three-quarters of the surface to allow for expansion during cooking.
-
Cook according to the waffle maker's instructions until the cycle is complete and the waffles are golden brown.
-
Serve immediately. This recipe yields four waffles, providing two portions.
-
Recommended Accompaniments: Sliced bananas, fresh berries, or a spread of peanut butter.

Nutrition Facts
Servings 2
- Amount Per Serving
- Calories 380kcal
- % Daily Value *
- Total Fat 2.5g4%
- Total Carbohydrate 60g20%
- Dietary Fiber 4g16%
- Sugars 15g
- Protein 25g50%
* Percent Daily Values are based on a 2,000 calorie diet. Your daily value may be higher or lower depending on your calorie needs.


