
Alright, team, gather ‘round. Let’s talk about the king of fancy dinners: Beef Wellington. I know it looks like something only chefs on TV make, but trust me we’ve totally got this. I’m going to walk you through my no-stress method for creating this absolute masterpiece. It’s all about that golden, flaky pastry hiding the most tender, juicy beef inside. Get ready to seriously impress everyone at your table.
Try my Beef Shawarma Wraps recipe.
Why You’ll Absolutely Love This Beef Wellington
Alright, let’s be real this isn’t your average weeknight dinner. This is a showstopper. But beyond the fancy reputation, here’s why making this Classic Beef Wellington is so darn rewarding:
→ It’s the Ultimate Show-Off Dish. Seriously, the “wow” factor is through the roof. Bringing this golden, gorgeous parcel to the table is a guaranteed way to impress your family, your friends, or your date. It looks like you slaved away for hours (and hey, you put in the work!), but the results are so worth it.
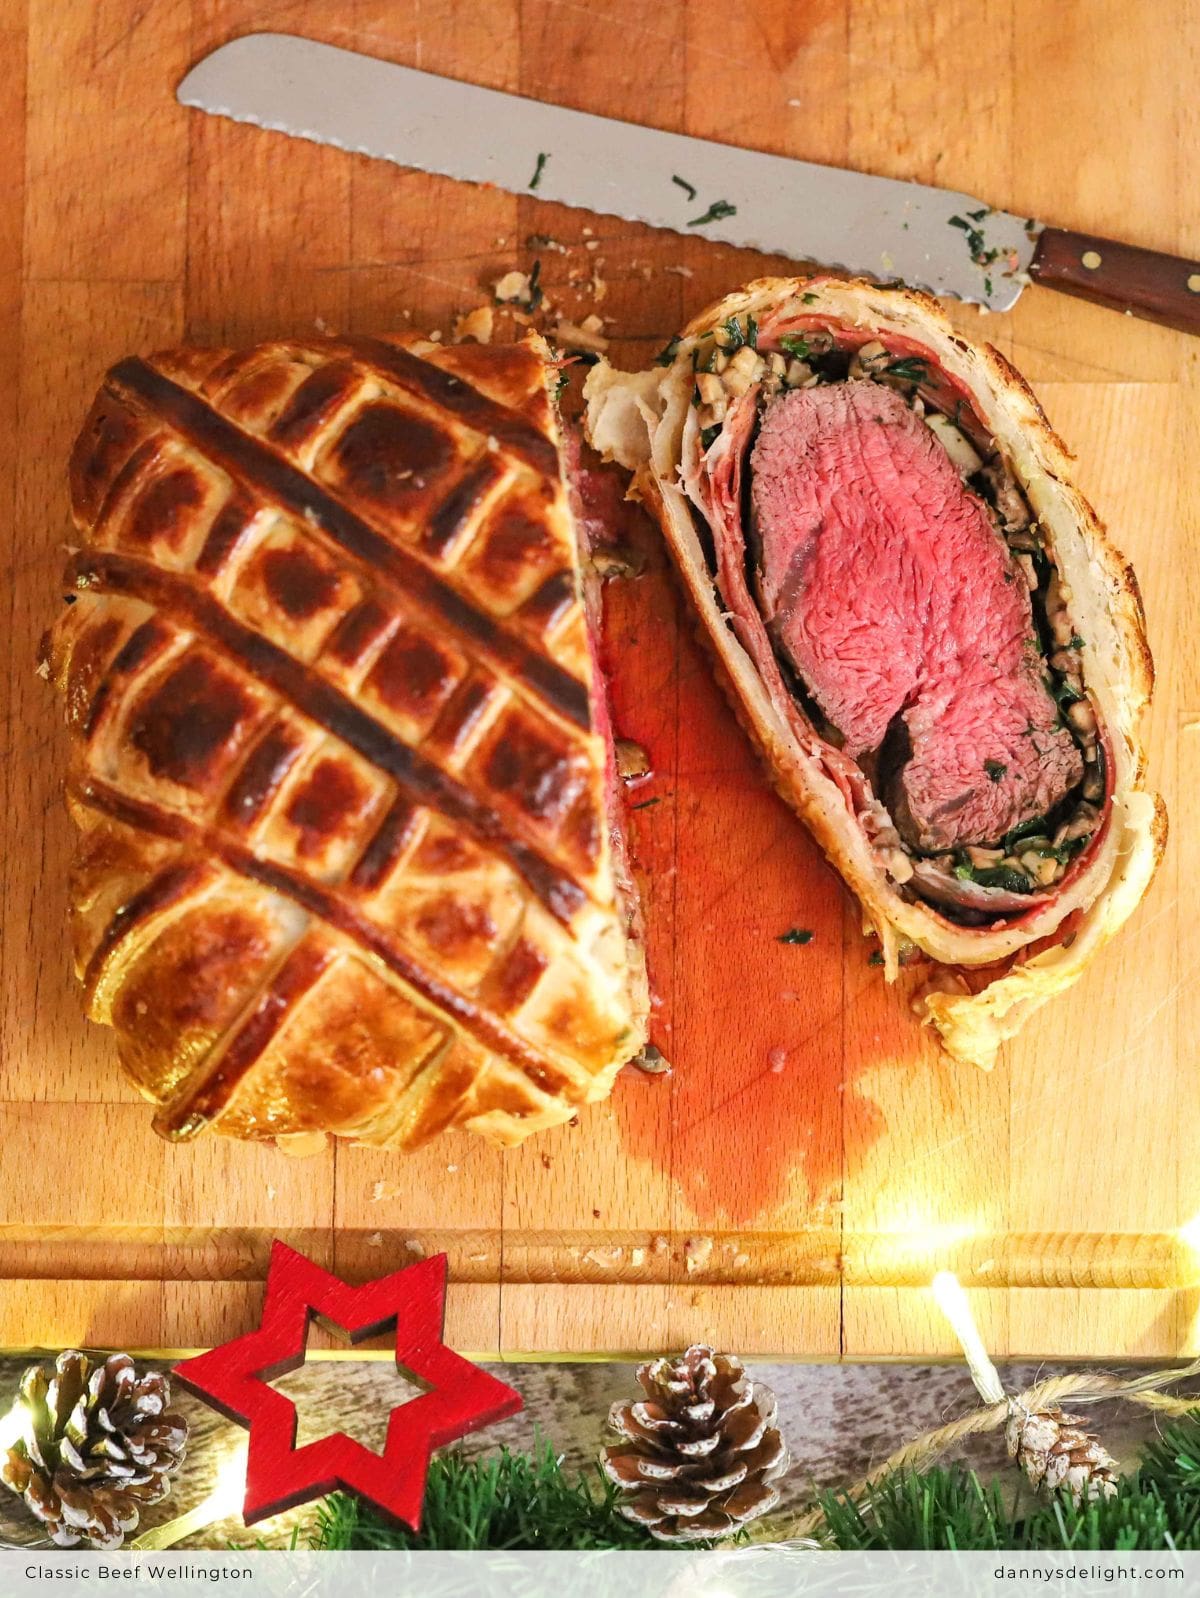
→ The Textural Party in Your Mouth. We’re talking about a perfect harmony of textures: incredibly tender, juicy beef wrapped in a layer of savory ham and earthy mushrooms, all encased in a shatteringly crisp, buttery puff pastry. Every single bite is an experience.
→ It’s a Fun Project (That’s Easier Than It Looks!). If you enjoy a little time in the kitchen where you can get creative and focus, you’ll love the process. It’s like edible arts and crafts for adults. Just follow the steps, take your time, and you’ll be amazed at what you can create.
→ Perfect for Special Occasions. This isn’t just a meal; it’s an event. It’s the perfect centerpiece for holidays, birthdays, anniversaries, or any time you want to celebrate and make some delicious memories.
→ That “I Did It!” Feeling. There’s a huge sense of accomplishment that comes with pulling off a classic recipe like this. Conquering the Beef Wellington is a badge of honor for any home cook. You’ll finish dinner feeling like a total kitchen champion.
Try my Bell Pepper Beef Nachos recipe.
What You’ll Need To Make
Let’s Talk About the Star Players 🏈
Okay, let’s break down the A-team of ingredients that make this dish so legendary. Using the good stuff here is non-negotiable it’s what takes this from a simple beef bake to a Beef Wellington.
→ The Beef: We’re using a center-cut beef tenderloin. This is the most tender, melt-in-your-mouth cut of beef you can get. It’s lean, buttery, and because we’re wrapping it up, it stays incredibly juicy. It’s the undisputed MVP of this recipe.
→ The Mushroom Layer (aka Duxelles): Don’t let the fancy name fool you! This is just chestnut mushrooms, parsley, and chives chopped super fine and cooked down into a savory, paste-like mixture. It’s your flavor powerhouse, adding a deep, earthy, umami kick that soaks into the pastry. So good!
→ The Parma Ham: This isn’t just for saltiness! Those thin slices of prosciutto create a protective barrier around the beef, keeping the pastry from getting soggy from the beef juices. It’s the crispy, salty security blanket your Wellington needs.
→ The Pastry: We’re keeping it real with store-bought, all-butter puff pastry. No shame in that game! It saves a ton of time and puffs up into the most gorgeous, flaky, golden-brown crust. It’s the delicious package that holds our little bundle of joy together.
NOTE: For measurements and rest of the ingredients check the recipe card below.
What You’ll Need To Do
Time required: 1 hour 10 mins
Let’s Make This Beautiful Beast!
Alright, friends, it’s showtime! Don’t let this dish intimidate you. We’re going to create a masterpiece together, step by step.
1. Get That Beef Beautiful!
First things first, crank your oven to 400°F (200°C). Take your gorgeous piece of beef tenderloin and give it a good pat-down with some paper towels. This helps us get a great sear! Generously season it all over with salt and pepper don’t be shy!
Melt half of your butter in a pan over medium heat. When it’s sizzling, gently place your beef in there. We’re not cooking it through, just giving it a gorgeous, brown crust on all sides. This should take about 6-8 minutes total. Once it’s bronzed and beautiful, move it to a plate to cool.
2. Whip Up That Savory Mushroom Jam
While the beef is cooling, let’s make the magic mushroom layer (duxelles, if you wanna be fancy). Finely chop your mushrooms, parsley, and chives.
Melt the rest of your butter in that same pan and toss in the mushrooms. Cook them down until all their moisture has evaporated and you’re left with a thick, pasty mixture. This is key! We don’t want a soggy Wellington. Stir in your fresh herbs, give it a taste, and season with salt and pepper. Set this aside to cool completely. No rushing we need it at room temp!
3. The Great Ham & Mushroom Blanket
Lay out a big piece of plastic wrap on your counter. Arrange your slices of Parma ham in a rectangle on top, slightly overlapping them like shingles on a roof.
Now, spread your cooled mushroom mixture evenly over the ham. Place your beautifully seared beef tenderloin right at one end. Here’s the fun part: using the plastic wrap to help you, tightly roll the ham and mushroom around the beef like a cozy blanket. Twist the ends of the plastic wrap to get a really firm, snug log. Pop this in the fridge for 10-15 minutes to let it set. This makes the next step so much easier!
4. Pastry Time! The Final Wrap
Roll out your puff pastry on a piece of baking paper large enough to hold your Wellington. Unwrap your beef log from its plastic blanket and place it in the center of the pastry.
Gently fold the pastry up and over the beef, creating a neat package. You want the edges to overlap by about half an inch. Trim any excess pastry (you can use these for cute little decorations!) and press the seams firmly to seal. Carefully flip the whole parcel over so the seam side is down on your baking tray. Looks pretty professional already, right?
5. The Golden Touch & Bake Off!
Whisk that single egg yolk with a tiny splash of water and brush it generously all over the pastry. This is what gives us that gorgeous, golden-brown, professional finish!
Bake your masterpiece for about 35 minutes on the middle rack, or until the pastry is a deep golden brown and *a meat thermometer inserted into the center of the beef reads 120°F (50°C) for medium-rare*. This is the most reliable way to know it’s perfect!
6. The Most Important Step: Patience!
When it comes out of the oven looking like a golden trophy, do not cut into it immediately! I know, it’s hard. Tent it loosely with foil and let it rest for a full 10 minutes. This lets the juices redistribute throughout the meat, ensuring every single slice is succulent.
Finally, transfer it to a cutting board, slice it into thick, show-stopping portions, and serve immediately. Get ready for the applause

Based on a standard serving of this Beef Wellington recipe, here are the approximate values.
Glycemic Index (GI) & Glycemic Load (GL)
- Glycemic Index (GI) per serving: Low (~35)
- Glycemic Load (GL) per serving: Low (~3)
Why: The only significant carbohydrate source is the puff pastry, which is a refined carb. However, the very high fat and protein content from the beef, ham, and butter significantly slows digestion and the absorption of sugars, resulting in a low overall glycemic impact.
Approximate Macro Nutritional Breakdown (Per Serving)
| Nutrient | Amount |
|---|---|
| Calories | ~ 580 kcal |
| Protein | ~ 32 g |
| Fat | ~ 38 g |
| Saturated Fat | ~ 15 g |
| Carbohydrates | ~ 25 g |
| Fiber | ~ 1 g |
| Sugars | ~ 2 g |
Note: These figures are estimates and can vary based on specific brands of ingredients (especially the pastry and the exact leanness of the beef) and precise portion sizes.
Get Free Cookbooks

Kickstart your keto journey with our FREE Keto Cookbooks! 🎉 Packed with delicious recipes, these print copies are yours for the taking. Don’t wait – order now and start cooking your way to a healthier you! 🚀📚
*Hurry! offer valid till stock lasts.
Easy Ingredient Swaps
Here are some simple and friendly ingredient swap ideas for your Beef Wellington recipe, perfect for accommodating different tastes or using what you have on hand.
Simple Swaps & Ideas
For the Beef:
- No Filet Mignon? The main goal is a tender, lean cut. A pork tenderloin makes a fantastic and more affordable “Wellington” swap. Just ensure it’s cooked to 145°F (63°C).
- Vegetarian Twist: Create a “Vegetable Wellington”! A large portobello mushroom cap or a blend of roasted veggies like sweet potato, beet, and butternut squash makes a hearty, delicious center.
For the Mushrooms:
- Not a Fan of Chestnuts? Cremini or baby bella mushrooms are an easy one-to-one swap and just as flavorful.
- Want a Deeper Flavor? Add a tablespoon of soy sauce or Worcestershire sauce to the mushroom mix while cooking for a big umami boost.
For the Ham:
- Can’t Find Parma Ham? Prosciutto is virtually identical. For a stronger, smokier flavor, thinly sliced Black Forest ham also works beautifully.
For the Pastry:
- Puff Pastry Allergy? For a gluten-free option, use a gluten-free puff pastry sheet (available in the freezer section of many stores).
- Different Crust: While not traditional, a brick of crescent roll dough pressed together at the seams can work in a pinch for a softer, flakier crust.
Flavor Boosters:
- Add an Extra Layer: Spread a thin layer of store-bought pâté or Dijon mustard over the ham before adding the mushrooms for an incredible depth of flavor.
- Herb Swap: Feel free to play with herbs! Thyme or tarragon would be lovely additions to or replacements for the parsley and chives.
Try my Zucchini and Ground Beef Stir Fry recipe.
Fun Twists & Flavor Tweaks
Here are some fun twists and tweak ideas to put your own signature spin on the Classic Beef Wellington…
1. The Mustard Lover’s Kick: Before wrapping the beef in the ham, give it a thin brush of whole grain mustard or a spicy English mustard. It adds a fantastic tangy punch that cuts through the richness.
2. The “Blues” Upgrade: For a seriously gourmet twist, crumble a little blue cheese (like Gorgonzola or Maytag) over the mushroom duxelles before you add the pastry. It melts into an incredibly rich and savory flavor.
3. Go Herby: Mix things up with your herbs! Fresh thyme or rosemary finely chopped into the duxelles would be a wonderful, aromatic change from the classic parsley and chives.
4. The Festive Holiday Version: Add a splash of red wine or brandy to the mushrooms as they cook. Let it evaporate completely before taking them off the heat. It adds a deep, complex flavor that’s perfect for a Christmas or New Year’s Eve dinner.
5. The Pastry Artist: Use any leftover pastry scraps to decorate the top! Create simple lattice patterns, leaves, or even a cute little holly berry design for the holidays. Just stick them on with a little extra egg wash.
6. Individual Portions (The Ultimate Dinner Party Flex): Instead of one large roast, create individual Wellingtons. Cut the tenderloin into 4-6 large medallions and wrap each one separately. This reduces the cooking time to about 20-25 minutes and makes serving a breeze.
7. The Umami Bomb: Stir a teaspoon of truffle oil or a tablespoon of truffle paste into the cooled mushroom duxelles. It elevates the earthy flavors to a whole new level of luxury.
8. A Different Dip: While it’s traditionally served on its own, setting out a small bowl of creamy horseradish sauce or a red wine reduction lets your guests add an extra zing if they want it.
Try my Taco Beef Salad Bowl with Pico de Gallo recipe.
Pro Tips for Wellington Success 🏆
Want to ensure your Beef Wellington is absolute perfection? These little tips make a HUGE difference!
1| Dry That Beef! This is tip #1 for a reason. Pat the tenderloin extremely dry with paper towels before searing. A dry surface = a killer crust, not a steamed one.
2| Cool It Down! I know, patience is hard. But letting the seared beef and the mushroom duxelles cool completely before assembling is non-negotiable. If they’re hot, they’ll steam the pastry and make it soggy. Nobody wants a soggy bottom!
3| Squeeze Your Mushrooms. After cooking the duxelles, transfer the mixture to a paper towel-lined bowl and give it a gentle press to soak up any last bit of moisture. This is your secret weapon against a wet filling.
4| Chill Out. After you wrap the beef in the ham and duxelles, pop that log back in the fridge for 10-15 minutes. A firm, cold log is infinitely easier to wrap in pastry neatly.
5| The Thermometer is Your Best Friend. Guessing if it’s done is a gamble. Use an instant-read thermometer! Pull it out of the oven when the center hits 120-125°F (49-52°C) for perfect medium-rare. It will continue to cook while resting.
6| Rest is Best. I promise, letting it rest for a full 10 minutes after baking is the final crucial step. This allows the juices to settle back into the meat, so when you slice it, you get clean, juicy slices instead of a river on your cutting board.
7| Sharpen Your Knife. Use the sharpest knife you have to slice through that beautiful pastry crust without squashing your masterpiece. A serrated bread knife works wonders here!
8| Leftover Pastry? Make Cheese Straws! Brush any scraps with egg wash, sprinkle with grated parmesan and paprika, twist, and bake for 10 minutes at 400°F for a delicious cook’s snack
Try my Slow Cooker Beef Bourguignon recipe.

How to Make Beef Wellington on a Budget 💰
Love the idea of Beef Wellington but nervous about the cost? Try these smart swaps and strategies to make this fancy feast a bit friendlier on your wallet!
1| Swap the Cut: Instead of premium center-cut tenderloin, use a whole beef tenderloin tail (it’s thinner but much cheaper per pound) or ask your butcher for a thick-cut beef eye of round or sirloin roast. Just be sure to trim it well and tie it into a neat log for even cooking.
2| Skip the Prosciutto: While Parma ham is traditional, thinly sliced Black Forest ham or even good-quality deli ham works well for creating that moisture barrier and adding saltiness. It’s a fraction of the cost!
3| Choose Your Mushrooms Wisely: White button mushrooms are almost always cheaper than cremini or chestnut mushrooms and will still give you that great earthy flavor in the duxelles.
4| DIY Pastry (If You’re Ambitious): Store-bought puff pastry is convenient, but making your own rough puff pastry at home is significantly cheaper if you have the time and don’t mind a little effort.
5| Check the Sales: This is a great recipe to plan around a sale. Keep an eye on your grocery store’s circulars and buy the beef when it’s on special, then freeze it until you’re ready to make this recipe.
6| Warehouse Club Advantage: If you have a membership to Costco or Sam’s Club, that’s usually the best place to buy a whole beef tenderloin at a much better price per pound. You can portion and freeze what you don’t use.
7| Size It Down: The recipe is perfect for a celebration, but if you’re just practicing or cooking for two, make a mini Wellington with a smaller piece of beef. You’ll use less of every ingredient and save money while still mastering the technique.
8| Grow Your Herbs: If you cook often, consider growing a small pot of parsley and chives on your windowsill. It’s far cheaper than buying a whole bunch from the store each time you need a tablespoon.
Try my Beef and Broccoli Stem Stir-Fry recipe.
Serving Ideas
What to Serve with Beef Wellington: The Ultimate Sidekicks
You’ve made the star of the show! Now, let’s talk about the supporting cast. These classic, crowd-pleasing sides are chosen to complement the rich, savory flavors without stealing the spotlight.
1| Creamy Dreamy Potatoes: You can’t go wrong here. Classic mashed potatoes (extra buttery, please!), smooth parsnip purée, or creamy polenta are the ultimate cozy base for that juicy slice of Wellington.
2| Simple & Elegant Veggies: Think green, crisp, and slightly tangy to cut through the richness.
- Garlicky Green Beans: Sautéed with a little lemon zest.
- Simple Roasted Asparagus: With just olive oil, salt, and pepper.
- Buttery Peas: Maybe tossed with fresh mint.
3| The Perfect Sauce: While it’s incredible on its own, a little sauce on the side never hurts.
- Classic Red Wine Reduction: Feels fancy but is actually simple to make.
- Creamy Horseradish Sauce: Adds a cool, sharp kick that pairs beautifully with the beef.
- Rich Béarnaise: For the ultimate decadent experience.
4| A Lively Salad: A light, acidic salad helps balance the meal.
- A Simple Arugula Salad with a lemon vinaigrette and shaved parmesan.
- A Shaved Fennel Salad with orange segments for a fresh, crisp bite.
Pro Tip: Keep your sides simple! The Wellington is the main event, so you want sides that enhance, not overwhelm, its amazing flavor. Enjoy your feast
Try my Rendang-Spiced Beef and Cauliflower recipe.

What to Drink with Beef Wellington 🍷
Pairing the right drink with your Beef Wellington can take your meal from great to unforgettable. Here are some classic and creative pairing ideas for both alcoholic and non-alcoholic beverages.
The rich, savory, and earthy flavors of Beef Wellington pair beautifully with drinks that offer balance think bold red wines, crisp contrasts, or earthy notes.
Alcoholic Pairings:
- Red Wine (The Classic Choice):
- Cabernet Sauvignon: The absolute top pick! Its bold tannins and dark fruit flavors (like blackcurrant) cut through the richness of the pastry and beef perfectly.
- Merlot: A slightly softer option with plum and cherry notes that complement the dish without overpowering it.
- Pinot Noir: A great choice if you prefer lighter reds. Its earthy notes harmonize beautifully with the mushroom duxelles.
- Craft Beer:
- Brown Ale or Porter: The malty, slightly nutty, and roasted notes in these beers mirror the savory, earthy flavors of the Wellington beautifully.
- Belgian Dubbel: Its complex, fruity, and spicy character can stand up to the dish’s richness.
- Cocktails & Spirits:
- Old Fashioned: The sweetness of the bourbon and the bitterness of the angostura bitters provide a sophisticated, strong contrast to the savory meal.
- Dry Martini: The crisp, clean, and bracing botanicals from the gin act as a fantastic palate cleanser between bites.
Non-Alcoholic Pairings:
- Sparkling Juices:
- Sparkling Red Grape Juice: Provides the complexity and body of red wine without the alcohol. Look for a brand with a deep, not-too-sweet flavor.
- Dry Sparkling Apple Cider: The effervescence and slight tartness cleanse the palate and cut through the richness.
- Crafted Sodas & Tonics:
- Cherry or Pomegranate Soda: Their tart and fruity profiles offer a nice contrast to the savory beef.
- Elderflower Tonic with a Splash of Lime: floral, slightly sweet, and refreshing.
- Zero-Proof “Spirits”:
- Alcohol-Free Gin & Tonic: The botanical notes mimic a classic G&T and work wonderfully as a palate cleanser.
- Seedlip Spice 94: Designed to pair with food, its warm, aromatic notes are a fantastic match for the hearty Wellington.
- Tea:
- Smoked Black Tea (Lapsang Souchong): This is a brilliant pairing! The smoky notes of the tea echo the seared crust on the beef and complement the mushrooms.
The Golden Rule: The best pairing is always what you enjoy most. So pour your favorite glass and dig in
Storage & Reheating Tips
Here are clear and practical storage and reheating tips for your Beef Wellington to ensure leftovers are just as delicious.
Storing Leftovers:
- Cool Completely: Let any leftover Wellington cool to room temperature before storing (no more than 2 hours after cooking).
- Refrigerate: Wrap tightly in plastic wrap or aluminum foil, or place in an airtight container. It will keep in the refrigerator for up to 3 days.
- Freeze (For Longer Storage):
- Wrap the whole Wellington or individual portions tightly in plastic wrap, then in foil to prevent freezer burn.
- Store in the freezer for up to 2 months.
- Thaw overnight in the refrigerator before reheating.
Reheating for Best Results:
- Oven Method (Highly Recommended):
- Preheat your oven to 350°F (175°C).
- Place the Wellington on a baking sheet. If it was refrigerated, bake for 15-20 minutes. If frozen, bake for 25-35 minutes, or until heated through.
- For the crispiest pastry, remove the foil for the last 5-10 minutes of heating.
- Air Fryer Method (For Crispy Pastry):
- Reheat at 325°F (160°C) for 5-8 minutes, or until warm and the pastry is crisp.
- Avoid the Microwave: We don’t recommend using the microwave, as it will make the pastry soggy and can overcook the beef.
Pro Tip: For the best experience, enjoy your Beef Wellington fresh. But if you have leftovers, reheating them gently in the oven is the best way to preserve that fantastic texture!
Try my Ground Beef and Potato Curry recipe.
Final Thoughts
And there you have it! You just nailed a Classic Beef Wellington. Slice into that beauty, take a look at what you made, and give yourself a well-deserved high five. This isn’t just a meal; it’s a full-on experience. I hope you feel as proud making it as I do. Now dig in, enjoy every single bite, and let me know how it turned out for you. You earned it, chef
Recipe Card
Classic Beef Wellington
Wow your guests with my foolproof Beef Wellington! 🤩 Tender beef, savory mushroom duxelles, and crispy puff pastry come together for a show-stopping meal. You've got this! 💪

Ingredients
Instructions
-
Prepare the Oven and Sear the Beef
Preheat the oven to 400°F (200°C). Pat the beef tenderloin completely dry using kitchen paper. Season generously on all sides with salt and pepper.
Melt half of the unsalted butter in a heavy-bottomed frying pan over medium heat. Once the butter is hot, sear the beef tenderloin until a browned crust forms on all sides. This process should take approximately 6 to 8 minutes. Transfer the seared beef to a plate and set aside to cool.
-
Prepare the Duxelles
While the beef cools, finely chop the chestnut mushrooms, parsley, and chives. Melt the remaining butter in the same frying pan. Add the mushrooms and cook over medium heat, stirring occasionally, until all moisture has evaporated and the mixture becomes a thick paste.
Remove the pan from the heat. Stir in the chopped parsley and chives, and season the mixture thoroughly with salt and pepper. Transfer the duxelles to a separate bowl and allow it to cool completely to room temperature.
-
Assemble the Wellington
Lay a large sheet of plastic wrap, approximately 12x16 inches, on a work surface. Arrange the slices of Parma ham in a rectangular lattice pattern on the plastic wrap, ensuring the slices overlap slightly.
Spread the cooled mushroom duxelles in an even layer over the ham. Place the cooled beef tenderloin at one end of the rectangle. Using the plastic wrap to assist, tightly roll the ham and mushroom mixture around the beef, ensuring a firm, cylindrical shape. Twist the ends of the plastic wrap to secure the parcel. Refrigerate for 10-15 minutes to firm the structure.
-
Encase in Pastry and Apply Egg Wash
Roll the puff pastry out on a sheet of parchment paper to a size sufficient to encase the beef. Unwrap the beef parcel from the plastic wrap and place it in the center of the pastry.
Fold the pastry neatly over the beef, allowing the edges to overlap by at least 1 cm (approximately ½ inch). Trim any excess pastry and press the seams firmly to seal. Carefully turn the parcel over so the seam side is down on a baking tray lined with the parchment.
Lightly beat the egg yolk with one teaspoon of water. Using a pastry brush, apply a thin, even coat of the egg wash over the entire surface of the pastry.
-
Bake and Rest
Place the baking tray in the preheated oven on the middle rack. Bake for approximately 35 minutes, or until the pastry is golden brown and a meat thermometer inserted into the center of the beef registers an internal temperature of 120°F (50°C) for medium-rare.
Upon removal from the oven, tent the Beef Wellington loosely with aluminum foil. Allow it to rest for a full 10 minutes. This step is critical for the juices to redistribute within the meat.
-
Serve
Using a sharp serrated knife, slice the Beef Wellington into thick portions. Serve immediately.
Nutrition Facts
Servings 8
- Amount Per Serving
- Calories 580kcal
- % Daily Value *
- Total Fat 38g59%
- Saturated Fat 15g75%
- Total Carbohydrate 25g9%
- Dietary Fiber 1g4%
- Sugars 2g
- Protein 32g64%
* Percent Daily Values are based on a 2,000 calorie diet. Your daily value may be higher or lower depending on your calorie needs.


